The PPM Image Format
Whenever you start a renderer, you need a way to see an image. The most straightforward way is to write it to a file. The catch is, there are so many formats. Many of those are complex. I always start with a plain text ppm file. Here’s a nice description from Wikipedia:
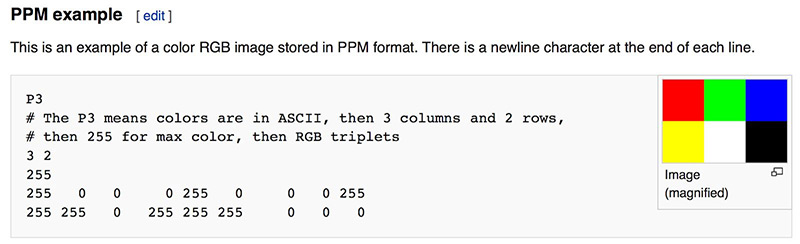
Figure 1: PPM Example
Let’s make some C++ code to output such a thing:1
fn main() {
    // Image

    const IMAGE_WIDTH: u32 = 256;
    const IMAGE_HEIGHT: u32 = 256;

    // Render

    println!("P3");
    println!("{IMAGE_WIDTH} {IMAGE_HEIGHT}");
    println!("255");

    for j in 0..IMAGE_HEIGHT {
        for i in 0..IMAGE_WIDTH {
            let r = i as f64 / (IMAGE_WIDTH - 1) as f64;
            let g = j as f64 / (IMAGE_HEIGHT - 1) as f64;
            let b = 0.0;

            let ir = (255.999 * r) as i32;
            let ig = (255.999 * g) as i32;
            let ib = (255.999 * b) as i32;

            println!("{ir} {ig} {ib}");
        }
    }
}
Listing 1: [main.rs] Creating your first image
There are some things to note in this code:
- The pixels are written out in rows.
- Every row of pixels is written out left to right.
- These rows are written out from top to bottom.
- By convention, each of the red/green/blue components are represented internally by real-valued variables that range from 0.0 to 1.0. These must be scaled to integer values between 0 and 255 before we print them out.
- Red goes from fully off (black) to fully on (bright red) from left to right, and green goes from fully off at the top (black) to fully on at the bottom (bright green). Adding red and green light together make yellow so we should expect the bottom right corner to be yellow.
-
It is Rust code of course. This won't be annotated anymore. ↩